Monday, December 1, 2014

Style Arc Laura Dress in Dark Chocolate and Velvety Chocolate Lace, Topped with Caramel


I've had my eye on this pattern for quite sometime. I bought a "Laura Set", and had already made the cardigan the other day. 


I just love Style Arc patterns. The designs, the fit, the clean and simple directions. They assume you know how to sew, so there's no micro-managed step-by-step directions. Therefore, might not be recommended as your very first sewing project, but once you know the basics, you'd appreciate their simple directions that do not crowd multiple large sheets of instructions that are folded up million  times.


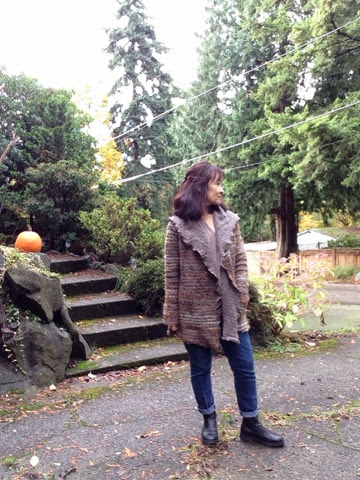
I made my usual  2" petite adjustment for the waist line.  I could have added 1" or even the entire 2" back at the hem, if I wanted it to be a little longer. This was juuuust long enough for me.

I bought size 8 this time. I bought size 6 for my previous top patterns from Style Arc. It was a snug fit, very fitted and I liked it for the most part. However, I realized I prefer it with just a little bit more ease, especially around the armscye.  So, I went for size 8 this time, and I am satisfied. (I usually wear RTW size 4 or 6 for tops)

The sleeves are see-through with this velvety chocolate lace. It's a poly stretchy lace knit with velvet-like feel. (I'm sure there is a name for it. What is that?!) I needed to cut off about 4.1/2" on the sleeve length.


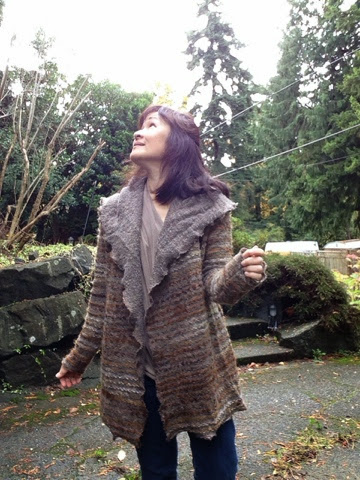
For the yokes, it's the same fabric as the sleeves but I decided to line with a light weight beige jersey knit I had in my stash so that it is not sooooo see-through. It's interesting to see how different the same fabric looks with a backing. Without the backing, it shows more of the color gradation of brown to black.

The difficult decision was the neck binding. Whether to use the main fabric?


Or the contrast lace fabric that I also used for the sleeves and the yokes?

After consulting with my RTW Fasting sisters, and sleeping on it, I decided to use the main. I think either would have worked out fine. I will, however, make the neckline opening a little wider next time.  I don't have a particularly long neck, and it looks more flattering on me if the neckline opening is a bit wider.


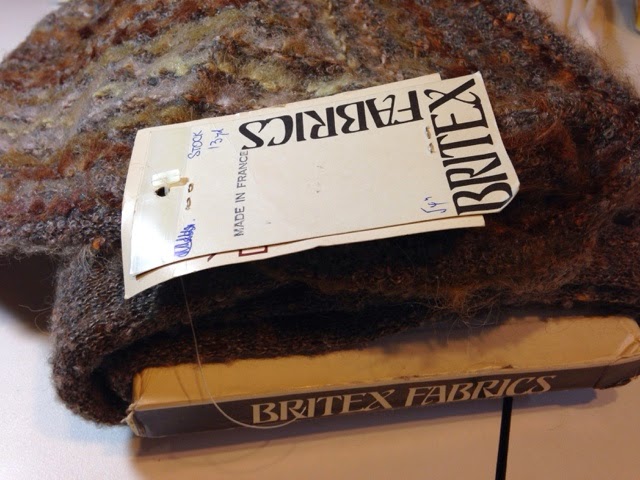
By the way, the main fabric is a dark chocolate brown Anna Sui knit I bought from Billie's Designer Fabrics at the Sewing Expo earlier this year. The poly lace knit is a thrift store find. I still have close to 2 yards or so of it.


After taking all the above shots, I decided that I didn't like the way I finished the hems. Both the sleeves and the dress itself.  For the sleeves, the folded up hem ruined the sheerness of the fabric. So, I decided to just leave the cut raw edge as is.


I was going to leave the raw edge as is for the dress hem.  But it was already curling up. So, I decided to use the overlock stitch on my machine. (By the way, I'm in love with the #2 presser foot on my machine when I saw so close to the edge of the fabric.) 
Then, I turned it over once and gave it a stitch with this color of thread. Caramel color!
 
Comfortable to wear - that's one of my top priorities in the garments I wear. It is comfy and I'm quite happy with my Thanksgiving weekend sewing project.

Now, I'm looking for a dress pants pattern (woven or stretch woven), preferably with pockets. Which Style Arc pants pattern is your favorite? Other than Style Arc, any recommendations?  


Friday, November 7, 2014

Style Arc Laura Cardi in Sweet Sweater Knit

Luscious. I LOVE this sweater knit.  Both sides. It just feels so soft and warm. Once I put it on, I don't want to take it off. The fabric looks, and feels gorgeous.

A rare moment here in Seattle autumn early winter. It suddenly dried up, so I dashed outside for a photo opp.

I took my usual 2" petite length adjustment at the waist. Still, debated on the final hem length. I decided not to shorten any further. I'm very happy with how it turned out.  It's like a cardigan/jacket hybrid to me.


Well, lucky me. This fabric came to me as a gift. This French wool blend sweater knit came from Britex Fabrics, which requires no introduction to us sewists, a fantastic fabric store in San Francisco. It's absolutely gorgeous. 

This fabric was a gift from a friend. She was an avid sewist. She lovingly collected lots and lots of beautiful fabrics over the years. (you know how that goes, we all have a stash!) Very sadly, she became unable to sew anymore due to a medical condition.  The family recently decided to release her huge collection of fabrics, patterns, and sewing notions. I am so fortunate to have received some beautiful fabrics and patterns. She has some darn good taste!


I've had my eye on Style Arc's Laura Cardi for some time.  I've just been looking for the right fabric to make it. When I saw this beautiful sweater knit, I knew it was the one. The bolt had about 3 yards. Plenty for this cardi jacket.  Perfect.  I'm so grateful.


Just a tiny bit bulky at the back of shawl collar/hood, but it is cozy and I love it.


The shawl collar turns into a hood. Even cozier with the hood on.

It has only been 10 minutes outside and the sun has already disappeared, and it's starting to get a little windy.  Oh, hey, my cardi jacket hood comes in handy!

By the way, I'm wearing one of my M 6841 tops inside. The perfect color to coordinate with this cardi.
I think I can perhaps call this reversible.  The pattern suggests that all the seams be serged or finished with overlock stitch. 

I think I can also wear it like this with a belt.

This project came together very quickly and easily. Possibly the fastest project I've ever sewn. However, I sat on it for a few days after I put the pieces together, trying to decide how I would want to finish all the seams.  I did a bunch of test sewing on scraps over two days until I decided on the #9 overlock stitch on my machine. (By the way, I can't tell you how amazing Bernina presser foot #2 is for overlock hem finishing. So smooth and so easy.) I tested a few different serged finishes, too, but felt that it would add a bit more bulk and weight than I wanted.

I love the wavy shawl collar edge created by the overlock stitch.  This was the effect I was hoping for, and I got it. So happy.


Here is the sleeve edge.
I'm satisfied with this.  I didn't change the sleeve length. It's a little on the long side, but for a cardi, I like it this way.


It goes very well with the brick siding backdrop! Haha.

I am really, really loving this cardi jacket. So far, every time I sewed up a Style Arc, I remind myself that I should use Style Arc patterns more often.  It is definitely my favorite pattern company right now. Its designs are clean and simple, I like its fitted style, I don't need to adjust anything  (except for the length - as I'm 5'1").  I used size 8 on this pattern, although I've used size 6 in my previous Style Arc patterns. On a couple of size 6 tops I sewed before, I felt that I wanted just a little bit more ease especially around armscye. It was a good idea to order size 8 for this cardi. I love the fit. Very comfortable. In RTW, I usually wear 4 or 6 for tops. 

15 minutes of dry weather was all we could get.  It's starting to sprinkle a little.


What a season appropriate first project of the month of November.  I gratefully receive this beautiful fabric.  I am very happy being wrapped in, and hugged by this fabric -- sweetly warm and cozy.

Happy sewing in this month of gratitude!


Thursday, October 30, 2014

McCall's Hoodie M6614

My son is a hoodie lover. I wanted to make him something and this pattern screamed to be chosen. I've previously made a view A, a long sleeve shirt with princess seams


Relatively easy (yup, if you are not too fussy about the fit, shape, length, etc.) 

My son wanted a particular length, fit, and color. I have pinned, basted, and had him try on a few times until we achieved the *right* look. (Boy, was he picky or what. Where does he get that from?!)


The pattern was either a hoodie with zipped front and hem band, or a princess seam pullover hoodie with no zipped front. He wanted a pullover hoodie without the princess seam, no zipped front. 

The pocket's handy for his iPhone.

I cut the View D front as one piece on fold. He wanted a slightly wider pocket, so added 1" to the width of the pocket. He had presented me with his favorite RTW sweatshirt.  It turns out, the finished  measurements were identical to the size medium of this pattern. I cut the hood that was meant for the pullover as I was making the pullover for which the hood will cross at the center front rather than the View D hood which is a zipped hoodie. Worked out perfectly.


I'm also happy to report that the fabric was from my stash. It was something that was given to me when I started sewing again last year. I received, in three different occasions, someone's unwanted/no longer needed fabric stash. This nearly 3 yards of green lightweight sweatshirt knit was perfect for the color my son asked for, and it is super comfy, good quality cotton. Yay. I love it whenever I can use something from my stash or recycle something.

I first placed the pocket too high. Didn't meet his approval.  It was all finished with pretty top stitch and everything, I had to very carefully rip it all out and redo.  But the result was worth it.  He loves the hoodie.


Lined the hood with slightly heavier material that has a felty/flannelly feel to it. Cozy to wear, but it made the hood just a tad heavy. (the only complaint from the wearer.) Again, I found in my stash this perfect color fabric just enough to line the hood. I think it is a cotton blend. Washed it to be sure it's shrink-safe.


Ok, I experimented with both indoor and outdoor shots. Neither reflects the true color of the actual fabric! The actual color is somewhere in between the two. 


The hoodie debuted on our shopping trip to a local goodwill to source materials for him to make accessories of the costume he is working on.  On our way out, we were greeted with this large, white, iridescent colored spider!  It was about the size of a quarter plus the legs. It was beautiful, but it didn't stop to pause for a photo for me. This is the only shot I could take.  Anyway, it was A LOT prettier than the photo shows.  Spiders - I'm not afraid of.  

Happy Halloween!